
Ever needed to send a love letter and trust that your recipient knew it was really you that sent it? If so then this post is for you! KERI provides the end-verifiability and secure attribution you need to trust your communications are secure.
Join Brett and Allie as they show how to send a secure love letter and a reply using KERI.
Follow along with the companion video of their story: KERI KLI Series: Sign and Verify.
7/24/24 Update: Uses latest development version of KERI v1.2.0-dev10. Added new Git repository https://github.com/kentbull/allie-brett and added both heartnet-cli-workflow.sh and heartnet-docker-workflow.sh scripts for each workflow, Command Line and Docker.
4/3/23 Update: once you know how to sign and verify then head on over to the newest tutorial showing you how to issue and verify credentials, the KERI Tutorial Series: Treasure Hunting in Abydos! Issuing and Verifying a Credential (ACDC).
Even if you have not such a need and you only have an interest in learning about KERI (Key Event Receipt Infrastructure) this post is also for you.
Sign and Verify
“Sign and Verify with Heartnet” is the first of the KERI Tutorial Series focused on accomplishing tasks the KERI command line. This tutorial uses KERIpy, the Python reference implementation of the KERI protocol.
Our Task

The task for today is simple:
- Establish trust between Allie and Brett’s communication lines
- Sign a love letter from Allie to Brett
- Verify the love letter signature
- Sign a love reply from Brett to Allie
- Verify the love reply signature
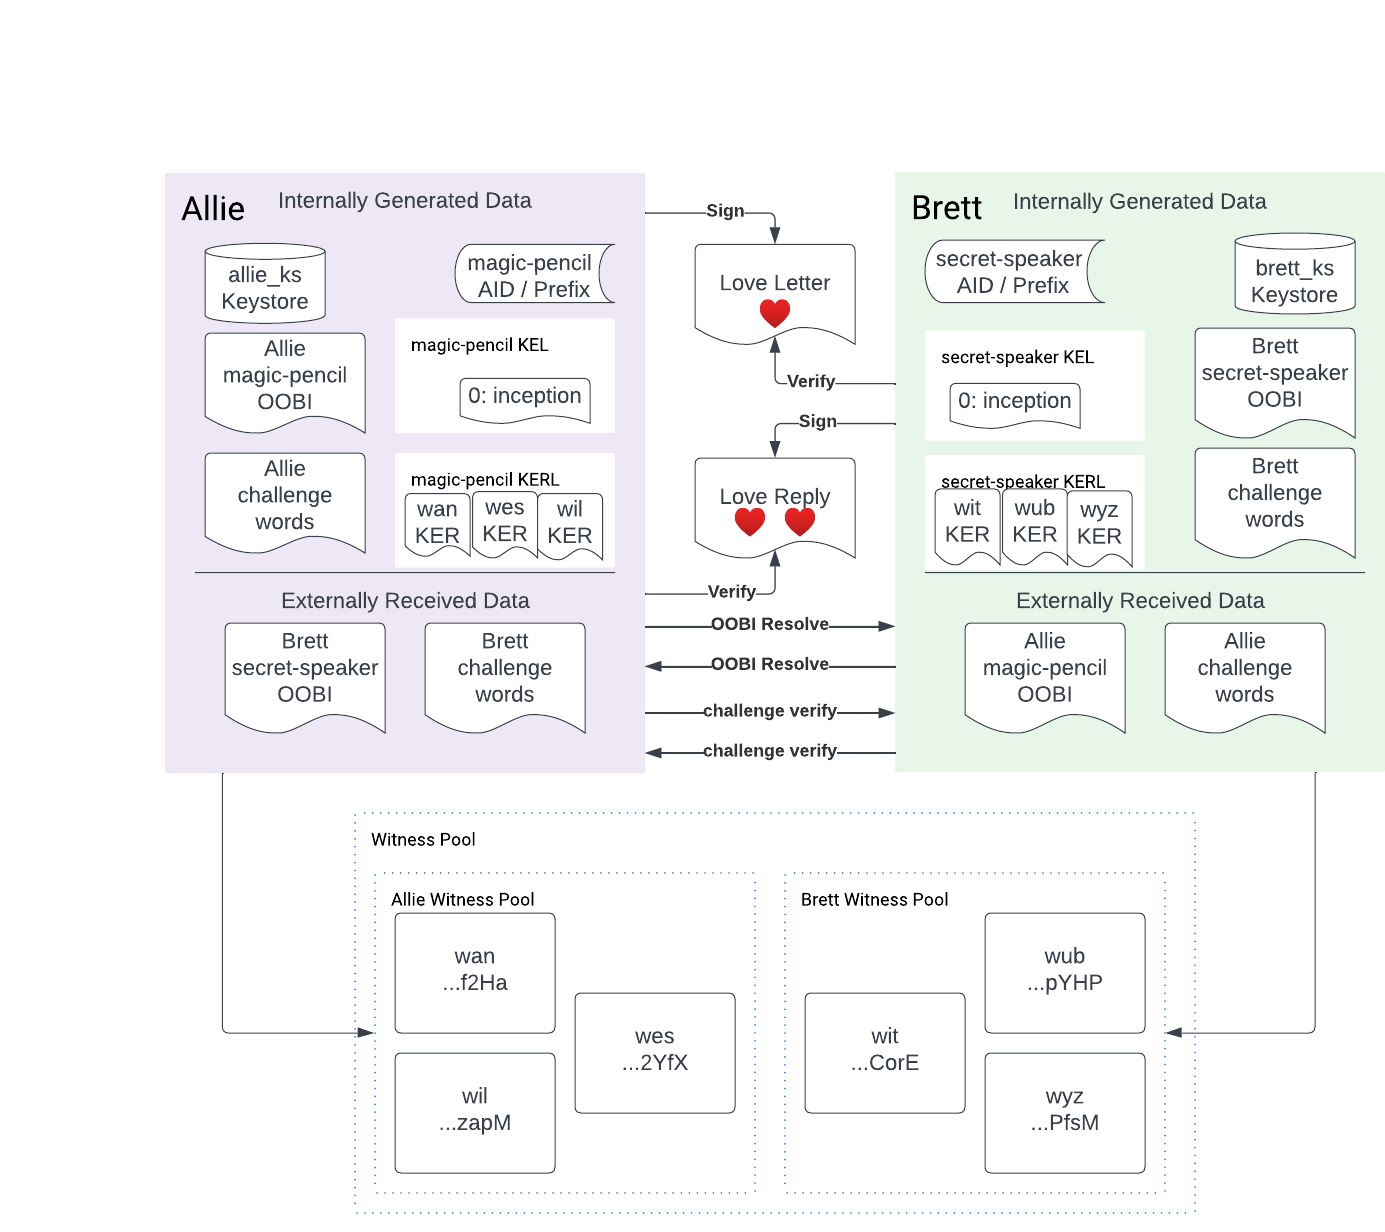
The diagram below shows what you will end up with, a local KERI network with two keystores, one each for Allie and Brett, and a pool of six witnesses, the demonstration witness pool provided by the Python implementation of KERI.
Outline
- Set up your machine for a KERI deployment.
- Manual Setup from source
- Docker Setup with WebOfTrust image
- Start Witness network
- Create configuration and keystore directories
- Initialize keystores
- Create KERI identifiers by making an inception event
- Connect the two KERI identifiers using OOBIs (direct service discovery)
- Increase the trust level with MFA challenge phrases
- Write and sign the love letter
- Verify the love letter signature
- Write and sign the love reply
- Verify the love reply
Code repository
Start by cloning the Git repository located at https://github.com/kentbull/allie-brett. Once you have cloned this repository you can find all commands from this post in either of the following two files:
heartnet-cli-workflow.shfor the local KERI command line workflow with theklitool installed locally on your machine.heartnet-docker-workflow.shfor running the entire tutorial in a Docker container built from theDockerfilein the source code repository.
General notes
- The “$” dollar sign character indicates the type of shell being used, specifically a user shell rather than a root shell (signified by a pound sign “#”). You do not need to type the “$” character when it appears at the beginning of a shell command line.
- I make frequent use of the shell continuation character “\” to provide readability to commands. This could be hard on the eyes of seasoned professionals though it is helpful for those new to KERI and those who appreciate separate arguments on separate lines.
You do not need to use this continuation character when you use the commands. You can omit it and type everything on one line. - Output of commands is typically included in code highlighting blocks directly after the command with a header of “Output:”.
Step 1: Machine Setup
You need to set up your machine to have KERI installed. You can either do this with Docker or with a local installation of Python.
Docker Setup with WebOfTrust image
This section details how to use the WebOfTrust/keri Docker image to perform the tutorial steps.
Docker Setup on OSX and Unix
- Install Docker. On OSX you can do this with Homebrew or the downloadable .DMG from the Docker website.
- Pull the image with:
$ docker pull weboftrust/keri:1.2.0-dev10 - Run the following command to verify the image works on your machine.
$ docker run --rm -it weboftrust/keri:1.2.0-dev10 version- This should print out the version “1.2.0-dev10”
Make sure to include the “version” command as “kli” is the default command in the WebOfTrust image.
After setting up with Docker then you can run the entire workflow with the following two commands from within the allie-brett repository:
docker build --no-cache -t kentbull/heartnet:latest .docker run --rm -it --entrypoint /bin/bash kentbull/heartnet
The rest of this article shows how to
Docker Setup on Windows
Thank you to Jim Martin for the Windows instructions here.
- Install Docker
Detailed instructions at Docker docs:
https://docs.docker.com/desktop/install/windows-install/- Install WSL2
Detailed instructions for installing WSL2:
https://learn.microsoft.com/en-us/windows/wsl/install
- The following will install the defaults (Ubuntu):
- Open Powershell
- Enter the command:
wsl –install - Restart your computer
- Download Docker Desktop installer for Windows
https://desktop.docker.com/win/main/amd64/Docker%20Desktop%20Installer.exe - Double-click the Docker installer to begin the install, or alternatively you can install via the the Powershell command line:
Start-Process 'Docker Desktop Installer.exe' -Wait install - Docker will not automatically start after installing. Use the Windows Start menu to find and start Docker Desktop.
- Install WSL2
- Run the following command at the Powershell command line
docker run --rm -it weboftrust/keri:1.2.0-dev10 version
Manual Setup from Source
Linux (recommended, especially as a Ubuntu container)
- Install Git, cURL, Python 3, Python 3 PIP, Python 3 Venv, Libsodium-dev, maturin, and the Rust toolchain
$apt update$ apt install git curl python3 python3-pip python3-venv libsodium-dev$ curl https://sh.rustup.rs -sSf | bash -s -- -y$ source "$HOME/.cargo/env"$ pip3 install maturin
- Make the working directory /keri
$ mkdir /keri$ cd /keri
- Install KERI
$ git clone https://github.com/WebOfTrust/keripy.git$ python3 -m pip install -e ./
- Verify your installation
$ kli version- If you see a warning about a SyntaxWarning for an invalid escape sequence you can ignore it.
- This should output something like “0.6.9” or “1.2.0-dev10”
Manual Setup on OS X / Mac
If you are going to install with OS X then be sure to translate all of the “/keri” directories to whatever the root directory is you are using for this tutorial work.
I will use $HOME/allie-brett.
You will also need to translate the “python” commands to whatever you end up having on your system whether “python3”, “python3.10”, or anything like that. I use “python” because I set up my system to point to my Pyenv installation in $HOME/.pyenv/shims/python binary.
- With Homebrew: Install Python 3, Python 3 PIP, Python 3 Venv, Libsodium-dev, maturin, and the Rust toolchain
- Installing Python 3 on a Mac is a rather involved process since the operating system default installation can interfere with things.
Use the following freeCodeCamp guide to install “pyenv” and then install Python 3 on top of that:
How to Install Python 3 on Mac – Brew Install Update Tutorial $ brew install libsodium$ pip install maturin
- Installing Python 3 on a Mac is a rather involved process since the operating system default installation can interfere with things.
- Set up the working directory
$ mkdir $HOME/allie-brett$ cd $HOME/allie-brett
- Install KERI system-wide (not in a virtual environment like venv)
$ git clone git clone https://github.com/WebOfTrust/keripy.git$ cd $HOME/allie-brett/keripy$ python -m pip install -e ./
- Verify your installation
$ kli version- This should output something like “0.6.8” or “0.6.9”
Manual Setup on Windows
Thanks to Jim Martin for providing these installation instructions.
Install the 64-bit versions of the following:
- Winget (may already be installed on your system, run winget -version at the Powershell command line to check.):
https://github.com/microsoft/winget-cli/releases - Git
Use winget at the Powershell command line:winget install --id Git.Git -e --source winget
Or download the most recent git installer from https://git-scm.com/download/win - Python3:
Use winget at the Powershell command line to find the most recent version of Python:winget search Python.Python
As of this writing, Python 3.12 is the most recent. Use the given Id to install python with winget:winget install -e --id Python.Python.3.12 - Python PIP:
Use the Powershell command to install:python get-pip.py - Venv:
Use the Powershell command to install:pip install virtualenv - Libsodium:
First, install download and build the Microsoft vcpkg tool at the Powershell command line:mkdir vcpkgcd vcpkggit clone https://github.com/Microsoft/vcpkg.git ../bootstrap-vcpkg.bat
Next use the vcpkg tool to install libsodium on your computer. At the Powershell command line:./vcpkg integrate install./vcpkg install libsodium
Alternatively, you can follow the directions for ‘pre-built libraries at:
https://doc.libsodium.org/installation/
*** There is a possibility the above may silently fail to place libsodium.dll in the Windows\System32 directory. You may need to manually copy the DLL from the pre-built library download into your Windows\System32 directory.
As of this writing, the most recent version of the DLL is located in the pre-built library zip file at:
\libsodium-1.0.18-msvc\libsodium\x64\Release\v142\dynamic\libsodium.dll - Rust toolchain:
Follow the installation instructions for 64-bit Rust at :
https://www.rust-lang.org/tools/install
Be sure to restart your Powershell terminal after installation has completed. After starting a new Powershell terminal, verify your Rust install by checking the installed version:rustc --version
If this does not work, the most likely issue is the PATH variable not being set properly. Consult the Rust installation page for more information.
Additional information about installing Rust on Windows and configuring Visual Studio code can be found at:
https://learn.microsoft.com/en-us/windows/dev-environment/rust/setup - Maturin:
At the Powershell command line, execute the following command:pip install maturin - Set up the working directory (don’t know if these work)
$ mkdir keri$ cd keri
- Install KERI
$ git clone git clone https://github.com/WebOfTrust/keripy.git$ cd %userprofile%\allie-brett\keripy$ python -m pip install -e ./
- Verify your installation
$ kli version- This should output something like “0.6.8”, “0.6.9”, or “1.0.0”.
This fails on Windows with the error:AttributeError: module ‘socket’ has no attribute ‘AF_UNIX’
This is due to AF_UNIX port types not being supported by Windows. Interestingly, the code is actually trying to open a logging file, which should be done a different way. It could be said that the flaw exists in the code.
In order to fix this, the following code modifications were necessary the ioflo/hio library, specifically in the ogling.py file. ioflo/hio is the async runtime KERI is built on top of.
Hack to make KERI work on windows (test with kli version)
At approx. line 183, you will see the lines of code:

facility = logging.handlers.SysLogHandler.LOG_USER # LOG_DAEMON
self.baseSysLogHandler = logging.handlers.SysLogHandler(address=address,
                                                        facility=facility)

Replace this code with the following hack:

===================START CODE HACK==========================
if sys.platform == 'win32':
  # cur_filename is obtained from the os.path so it matches the source code file.
  # a better fix would be using the app name or something else relevant to the logger.
  cur_filename = os.path.splitext(os.path.basename(__file__))[0]
  log_filename = 'logs' + os.sep + 'Log_' + cur_filename + '.txt'

  # make sure the log directory exists
  if not os.path.exists("logs"):
    os.makedirs('logs')

  # use a logging handler more appropriate to windows
  self.baseSysLogHandler = logging.handlers.WatchedFileHandler(
    os.environ.get("LOGFILE", log_filename))
else:
  # if not on Windows, use the old way
  facility = logging.handlers.SysLogHandler.LOG_USER # LOG_DAEMON
  self.baseSysLogHandler = logging.handlers.SysLogHandler(address=address,
                                                          facility=facility)
===================END CODE HACK==========================

After this fix, you should be able to run the kli version command and be rewarded with results like the following:

\> kli version
1.2.0-dev10

In addition, you should also see a new logs directory inside the keri directory which contains an empty file:

Log_ogling.txt
The rest of the tutorial will be using Linux since it is the easiest to work with. If you aren’t yet familiar with Docker I highly recommend you take the plunge and learn how to use it. You will be well rewarded for your efforts.
Script Utilities
The heartnet-cli-workflow.sh script uses some colored printing utilities in the print-colors.sh script reproduced below. This enables breaking up the monotony of white text on a black background, or the reverse in dark mode, with refreshing colored text.
#!/bin/bash

# print color functions
print_green() {
  text=$1
  printf "\e[32m${text}\e[0m\n"
}

print_yellow(){
  text=$1
  printf "\e[33m${text}\e[0m\n"
}

print_red() {
  text=$1
  printf "\e[31m${text}\e[0m\n"
}

print_lcyan() {
  text=$1
  printf "\e[96m${text}\e[0m\n"
}
The main script heartnet-cli-workflow.sh sources (imports) this file at the top to make all of the colored text functions available.
The rest of the post walks you through the heartnet-cli-workflow.sh script.
Step 2: Start Witness Network
Starting a witness network takes a few commands in the provided script. You can also just start the demo witnesses in another terminal like below. The reason why you need a witness network is to provide duplicity detection for key events in key event logs, though that is overkill for this tutorial. This tutorial shows you how to use witnesses to give you a gentle, light introduction to them. Witnesses are not strictly needed for signing and verification to work.
kli witness demo

# Output will look like:
Witness wan : BBilc4-L3tFUnfM_wJr4S4OJanAv_VmF_dJNN6vkf2Ha
Witness wil : BLskRTInXnMxWaGqcpSyMgo0nYbalW99cGZESrz3zapM
Witness wes : BIKKuvBwpmDVA4Ds-EpL5bt9OqPzWPja2LigFYZN2YfX
Witness wit : BM35JN8XeJSEfpxopjn5jr7tAHCE5749f0OobhMLCorE
Witness wub : BIj15u5V11bkbtAxMA7gcNJZcax-7TgaBMLsQnMHpYHP
Witness wyz : BF2rZTW79z4IXocYRQnjjsOuvFUQv-ptCf8Yltd7PfsM
If you want to use the same terminal for all commands then ensure you follow the command with the ampersand “&” sign so it runs in the background and you can use your terminal session for the rest of the commands. Alternatively you can run this in a separate terminal window or with something like the screen command.
The witness network is a set of six witnesses separated into two groups, three each for Allie and Brett.
The script uses a few more commands including wait_for, which is a handy utility to wait for connections on a port to be accepted in order to move on. After starting the witnesses in the background with the trailing ampersand the process identifier (pid) is retrieved from the preceding command with $! and added to the PID_LIST variable that is used in the kill -9 $PID_LIST command towards the end of the script.
wait_for() {
  local host=$1
  local port=$2
  local timeout=${3:-30}

  for ((i=0; i<timeout; i++)); do
    if nc -z "$host" "$port"; then
      return 0
    fi
    sleep 1
  done

  return 1
}

#
# Start witness network
#
PID_LIST=""
kli witness demo &
pid=$!
PID_LIST+="${pid}"
print_green "Witness network started with PID: ${pid}"
print_lcyan "Waiting 5 seconds for witness network to accept connections"
sleep 5
# Wait for the HTTP port 5642 or TCP port 5632 to be accepting connections
if wait_for 127.0.0.1 5642 || wait_for 127.0.0.1 5632; then
  print_green "Witness network is accepting connections"
else
  print_red "Timeout waiting for witness network to accept connections"
  exit 1
fi
The set of witness AIDs are exported individually in variables for use through the script. The AIDs are always the same for the six kli demo witness witnesses because their salts stay the same which means their generated keys and inception events are identical thus resulting in the same AIDs.
export WAN_WITNESS_AID="BBilc4-L3tFUnfM_wJr4S4OJanAv_VmF_dJNN6vkf2Ha"
export WIL_WITNESS_AID="BLskRTInXnMxWaGqcpSyMgo0nYbalW99cGZESrz3zapM"
export WES_WITNESS_AID="BIKKuvBwpmDVA4Ds-EpL5bt9OqPzWPja2LigFYZN2YfX"
export WIT_WITNESS_AID="BM35JN8XeJSEfpxopjn5jr7tAHCE5749f0OobhMLCorE"
export WUB_WITNESS_AID="BIj15u5V11bkbtAxMA7gcNJZcax-7TgaBMLsQnMHpYHP"
export WYZ_WITNESS_AID="BF2rZTW79z4IXocYRQnjjsOuvFUQv-ptCf8Yltd7PfsM"
Step 3: Create keystore bootstrap configuration files
You must first create a KERI keystore before you can create any identifiers. You do this with the kli incept command. This involves making a few directories and configuration files. If you haven’t seen the “{,}” syntax before in making directories it allows you to specify a list of directories to be made at a given level.
The two witness configuration files for Allie and Brett are created in-line in the heartnet-cli-workflow.sh script as heredocs and then saved to temporary JSON files. Similarly the “magic-pencil” and the “secret-speaker” KERI autonomic identifier (AID) configuration files are also included as heredocs and saved to temporary JSON files.
# read in keystore configuration JSON from heredoc
read -r -d '' ALLIE_KEYSTORE_CONFIG_JSON <<EOM
{
  "dt": "2022-01-20T12:57:59.823350+00:00",
  "iurls": [
    "http://127.0.0.1:5642/oobi/${WAN_WITNESS_AID}/controller",
    "http://127.0.0.1:5643/oobi/${WIL_WITNESS_AID}/controller",
    "http://127.0.0.1:5644/oobi/${WES_WITNESS_AID}/controller"
  ]
}
EOM

# Create temporary file to store the JSON config
temp_allie_keystore_config=$(mktemp)
# write the JSON config to the temporary file
echo "${ALLIE_KEYSTORE_CONFIG_JSON}" >${temp_allie_keystore_config}
# add .json extension to the temporary file so it is usable by the KERI CLI
cp -v ${temp_allie_keystore_config} ${temp_allie_keystore_config}.json
print_lcyan "Allie's keystore configuration file created"
cat ${temp_allie_keystore_config}.json
echo

read -r -d '' BRETT_KEYSTORE_CONFIG_JSON <<EOM
{
  "dt": "2022-01-20T12:57:59.823350+00:00",
  "iurls": [
    "http://127.0.0.1:5645/oobi/${WIT_WITNESS_AID}/controller",
    "http://127.0.0.1:5646/oobi/${WUB_WITNESS_AID}/controller",
    "http://127.0.0.1:5647/oobi/${WYZ_WITNESS_AID}/controller"
  ]
}
EOM

temp_brett_keystore_config=$(mktemp)
echo "${BRETT_KEYSTORE_CONFIG_JSON}" >${temp_brett_keystore_config}
cp -v ${temp_brett_keystore_config} ${temp_brett_keystore_config}.json
print_lcyan "Brett's keystore configuration file created"
cat ${temp_brett_keystore_config}.json
echo
At this point you have created the keystore configuration files and have the foundation set up for both Allie and Brett

Step 4: Initialize Keystores
You create a unique cryptographic salt for Allie that is used to derive her public key. This salt should be kept secure with the utmost protections. You can use other sources for the salt.
For Allie:
#
# Create keystores for Allie and Brett
#
export ALLIE_SALT=0AAiU3Ih3WYmTuWWymZTYFbP # Use hardcoded salt for tutorial purposes
print_yellow "using hardcoded salt for Allie: ${ALLIE_SALT}"
# use export ALLIE_SALT="$(kli salt)" to get your own unique salt value if you want
kli init \
    --name allie_ks \
    --nopasscode \
    --salt ${ALLIE_SALT} \
    --config-file ${temp_allie_keystore_config}.json
And some example output:
KERI Keystore created at: /keri/allie/allie_ks
KERI Database created at: /keri/allie/allie_ks
KERI Credential Store created at: /keri/allie/allie_ks

Loading 3 OOBIs...
http://127.0.0.1:5642/oobi/BBilc4-L3tFUnfM_wJr4S4OJanAv_VmF_dJNN6vkf2Ha/controller succeeded
http://127.0.0.1:5643/oobi/BLskRTInXnMxWaGqcpSyMgo0nYbalW99cGZESrz3zapM/controller succeeded
http://127.0.0.1:5644/oobi/BIKKuvBwpmDVA4Ds-EpL5bt9OqPzWPja2LigFYZN2YfX/controller succeeded
Then do the same process for Brett:
export BRETT_SALT=0ABfYE2dBj96dT9MNMFIT4Fw # Use hardcoded salt for tutorial purposes
print_yellow "using hardcoded salt for Brett: ${BRETT_SALT}"
# use export BRETT_SALT="$(kli salt)" to get your own unique salt value if you want
kli init \
    --name brett_ks \
    --nopasscode \
    --salt ${BRETT_SALT} \
    --config-file ${temp_brett_keystore_config}.json
Which should give you output that looks like the following:
KERI Keystore created at: /keri/brett/brett_ks
KERI Database created at: /keri/brett/brett_ks
KERI Credential Store created at: /keri/brett/brett_ks

Loading 3 OOBIs...
http://127.0.0.1:5645/oobi/BM35JN8XeJSEfpxopjn5jr7tAHCE5749f0OobhMLCorE/controller succeeded
http://127.0.0.1:5646/oobi/BIj15u5V11bkbtAxMA7gcNJZcax-7TgaBMLsQnMHpYHP/controller succeeded
http://127.0.0.1:5647/oobi/BF2rZTW79z4IXocYRQnjjsOuvFUQv-ptCf8Yltd7PfsM/controller succeeded
You have now successfully initialized the keystores for Allie and Brett.

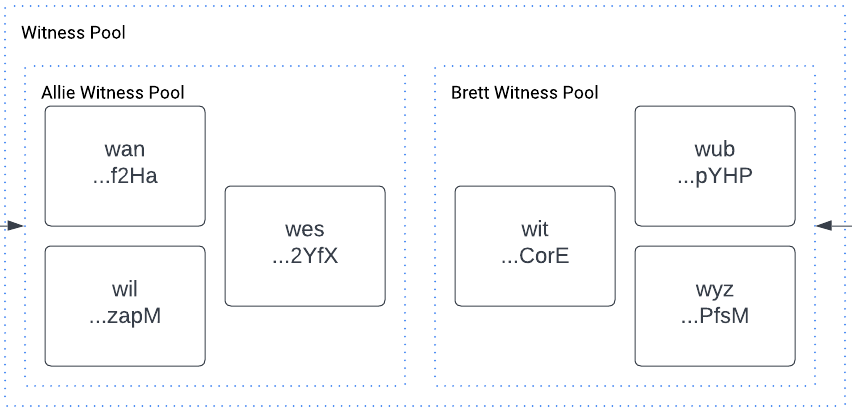
Step 5: Create KERI identifiers by making an inception event
The most important part to being able to use KERI is the creation of KERI identifiers, also known as Autonomic Identifiers, or AIDs. One identifier will be created for each Allie and Brett. The witnesses in the witness pools will each observe, or witness, the inception event and give a receipt of that observation back to the AID controller.
- Allie’s AID will be aliased as “magic-pencil”
- She writes her love letter with a magic pencil!
- Brett’s AID will be aliased as “secret-speaker”
- Brett has a special device known as a secret speaker that will only play verified messages from his sweetheart.
For Allie we again use a heredoc (started with “<<” and bounded by EOM at the start and end) to provide an in-line configuration JSON string that is saved to a temporary JSON file and later used for the kli incept command.
# Create inception configuration files for Allie and Brett
read -r -d '' ALLIE_AID_INCEPTION_CONFIG <<EOM
{
  "transferable": true,
  "wits": [
    "${WAN_WITNESS_AID}",
    "${WIL_WITNESS_AID}",
    "${WES_WITNESS_AID}"
  ],
  "toad": 3,
  "icount": 1,
  "ncount": 1,
  "isith": "1",
  "nsith": "1"
}
EOM

temp_allie_aid_inception_config=$(mktemp)
echo "${ALLIE_AID_INCEPTION_CONFIG}" >${temp_allie_aid_inception_config}
cp -v ${temp_allie_aid_inception_config} ${temp_allie_aid_inception_config}.json
print_lcyan "Allie's inception configuration file created"
cat ${temp_allie_aid_inception_config}.json
echo

# Create inception event for Allie
print_green "Creating inception event for Allie"
kli incept \
    --name allie_ks \
    --alias magic-pencil \
    -f ${temp_allie_aid_inception_config}.json
This will have output similar to the following:
Waiting for witness receipts...
Prefix  EFgDuEHVf7HtqPQ5Ng_rctkXIRqNNIZEUH9svN7AFzjg
	Public key 1:  DAgpiAffZgMsZfZ1dfeqxC_CoMbay0ExoYGwRtVybCFQ
Place the prefix in a variable for later:
export ALLIE_PREFIX=EFgDuEHVf7HtqPQ5Ng_rctkXIRqNNIZEUH9svN7AFzjgFor Brett do the same process:
# Create inception configuration file for Brett
read -r -d '' BRETT_AID_INCEPTION_CONFIG <<EOM
{
  "transferable": true,
  "wits": [
    "${WIT_WITNESS_AID}",
    "${WUB_WITNESS_AID}",
    "${WYZ_WITNESS_AID}"
  ],
  "toad": 3,
  "icount": 1,
  "ncount": 1,
  "isith": "1",
  "nsith": "1"
}
EOM

temp_brett_aid_inception_config=$(mktemp)
echo "${BRETT_AID_INCEPTION_CONFIG}" >${temp_brett_aid_inception_config}
cp -v ${temp_brett_aid_inception_config} ${temp_brett_aid_inception_config}.json
print_lcyan "Brett's inception configuration file created"
cat ${temp_brett_aid_inception_config}.json
echo

# Create inception event for Brett
print_green "Creating inception event for Brett"
kli incept \
    --name brett_ks \
    --alias secret-speaker \
    -f ${temp_brett_aid_inception_config}.json
The output of the kli incept command should look similar to the following:
Output:
Waiting for witness receipts...
Prefix  EMFWPbZf4uG2XUV-LSJ4zWkLU-2tbuCMZh36gW1NeJiA
	Public key 1:  DE2RDQFCUvEx8kcKEg15S8txBZ8X1lURdwLpWylLD2Jm
Do the same thing for Brett’s prefix:
export BRETT_PREFIX=EMFWPbZf4uG2XUV-LSJ4zWkLU-2tbuCMZh36gW1NeJiANow that both of the identifiers are set up then key event logs (KELs) have been created for Allie and Brett. You also see that receipts from each of the witnesses sent back to the controller of each AID are stored in the key event log and can be called a key event receipt log (KERL).
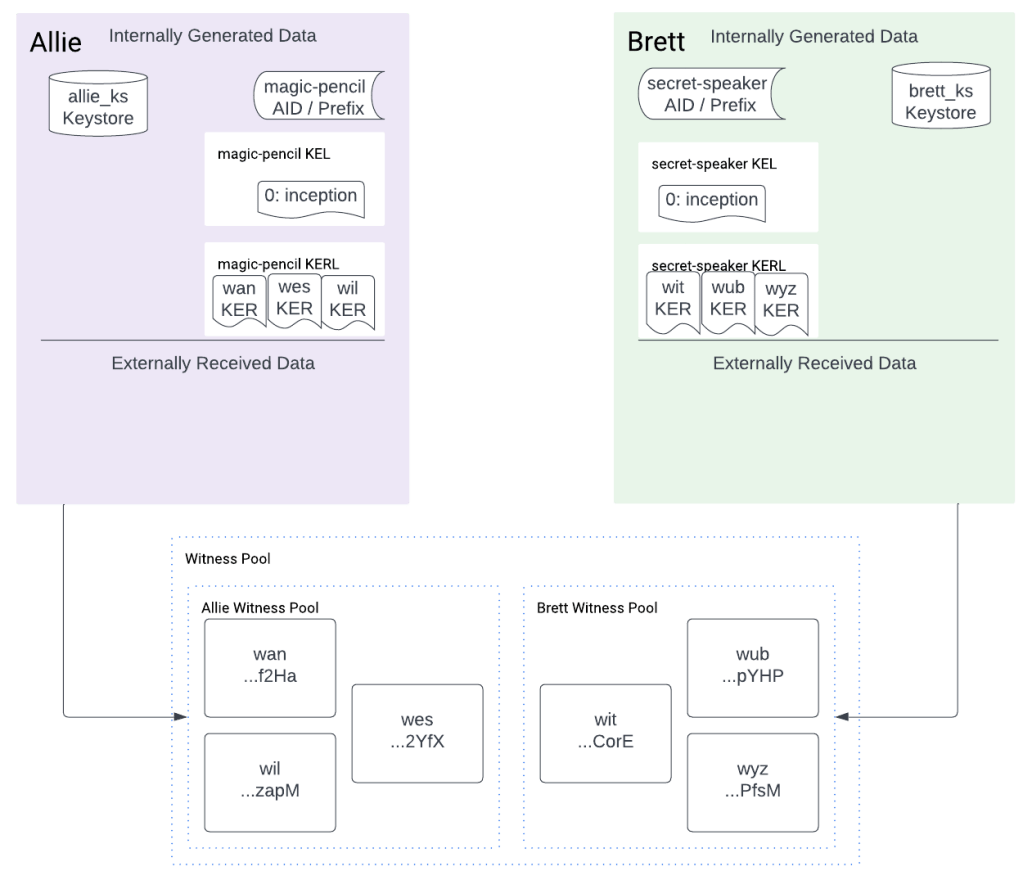
Step 6: Connect the two KERI identifiers using OOBIs (direct service discovery)
Currently Allie and Brett’s KERI controller nodes (their AID controllers) do not know about each other and must discover each other (be introduced) to be able to see each other, read each other’s key event logs, and use the public keys in those key event logs to verify message signatures.
To do this you first generate an Out Of Band Introduction (OOBI) value for a given source identifier and then you pass that value to the destination who you want to learn about the location of, or discover, the source.
OOBI Generation
For Allie we can generate an OOBI with the kli oobi generate command
$ kli oobi generate \
      --name allie_ks \
      --base /keri/allie \
      --alias magic-pencil \
      --role witness

Output:
http://127.0.0.1:5642/oobi/EGdeGrvLiZ7K8KFuSrFhc4AghPwkwi-qEMGKokaTh2JP/witness
http://127.0.0.1:5643/oobi/EGdeGrvLiZ7K8KFuSrFhc4AghPwkwi-qEMGKokaTh2JP/witness
http://127.0.0.1:5644/oobi/EGdeGrvLiZ7K8KFuSrFhc4AghPwkwi-qEMGKokaTh2JP/witness
The script uses a combination command with command substitution to place the first OOBI URL into an environment variable:
export ALLIE_OOBI=$(kli oobi generate \
    --name allie_ks \
    --alias magic-pencil \
    --role witness | head -n 1)
print_lcyan "Allie's OOBI is: ${ALLIE_OOBI}"
Do the same thing for Brett:
export BRETT_OOBI=$(kli oobi generate \
    --name brett_ks \
    --alias secret-speaker \
    --role witness | head -n 1)
print_lcyan "Brett's OOBI is: ${BRETT_OOBI}"
Now that you have these OOBI URLs generated you can use them to tell each participant where the other is, which is required in order to send them messages.
OOBI Resolution (discovery)
We have Allie introduce her magic-pencil AID to Brett followed by Brett introducing his secret-speaker AID to Allie. This mutual resolution of OOBIs to completes the discovery process.
For Brett:
kli oobi resolve \
    --name brett_ks \
    --oobi-alias magic-pencil \
    --oobi "${ALLIE_OOBI}"

Output:
http://127.0.0.1:5642/oobi/EGdeGrvLiZ7K8KFuSrFhc4AghPwkwi-qEMGKokaTh2JP/witness resolved
This introduces Allie to Brett. Allie has shared her magic-pencil OOBI with Brett and Brett has resolved that OOBI (a URL) using typical internet infrastructure to find and connect with Allie’s AID. Brett’s secret-speaker AID then analyzes the key event log of Allie’s magic-pencil AID and verifies it so Brett’s secret-speaker AID knows it can trust it is really speaking with Allie’s magic-pencil AID.

For Allie:
kli oobi resolve \
    --name allie_ks \
    --oobi-alias secret-speaker \
    --oobi "${BRETT_OOBI}"

Output:
http://127.0.0.1:5645/oobi/EMFWPbZf4uG2XUV-LSJ4zWkLU-2tbuCMZh36gW1NeJiA/witness resolved
This introduces Brett to Allie. Brett gives his secret_speaker_oobi value to Allie which she uses to then resolve his location using typical internet infrastructure, establishes a connection with him, and then verifies his key event log for the secret-speaker AID to ensure she can trust the secret-speaker.
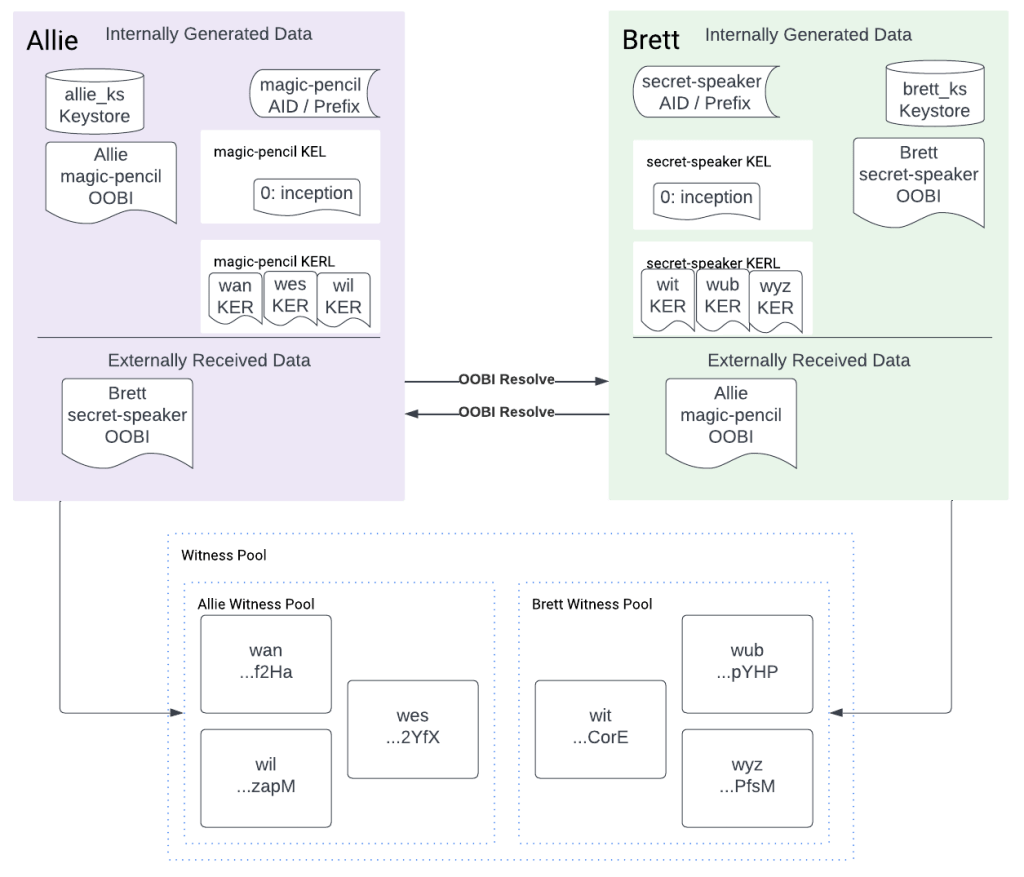
Step 7: Increase the trust level with MFA challenge phrases
Purpose of KERI Challenge Response and Verification – Authenticity
Brett and Allie need to know they are really talking to each other over the internet. They need authenticity of their digital communications, meaning they both know exactly who they are talking to over the internet. Since packets can be forged, man in the middle attacks (MITM) can be performed, and other attacks like eclipse attacks, then people need a way to ensure authenticity of communications. The challenge response and verification process provide that authenticity.
For Allie and Brett they both generate their own challenge phrase which they send to the other party using an out of band communication channel. What out of band means in this context is something that is out of band with respect to the internet infrastructure transmitting text across the internet. Using a video call and the on-call chat box or a voice call is sufficient. The point is to not use the same communication channel to send the challenge words that is used to send the challenge response because you are trying to protect from man-in-the-middle (MITM) attacks that target internet infrastructure. If you don’t use out of band communication to send the challenge words then you don’t know for sure whether or not you are suffering from a MITM attack.
So to repeat out of band in this context means using two different communications channels to send different parts of the challenge response message. Using a on-call chat for something like a Zoom call, even though it is across the internet, is considered sufficiently out of band because you can be reasonably assured that hackers have not hacked Zoom’s infrastructure to change your challenge response words. If you have need for the absolute highest levels of security then you can transmit challenge words using voice or other means such as a physical piece of paper, USB drive, or other secure transport.
Performing KERI Challenge Response and Verification
To perform the challenge response and verification process between two identifiers each party can send a challenge to the other identifier using the kli challenge generate/respond/verify commands that if successfully met confirms that each party truly controls their identifier.
What this breaks down into is
- generating a set of challenge words with one party (B)
- sending those challenge words to the other party (A)
- having the other party (A) sign the challenge words
- the signing party (A) sending the words and the signature back to the challenging party (B)
- the challenging party (B) verifying both the words match and the signature on the words matches the public key specified by the other party’s (A) key event log (KEL) and identifier.
Allie and Brett Challenge Response and Verification
Each party signs their challenge words and sends a signed message back to the challenging party after which the challenging party who generated the challenge words verifies the signature of the signed words.
Generate Challenge Phrase
The kli challenge generate command works like so:
$ kli challenge generate --out string

Sample Output:
ranch space pipe later they jazz retreat tide expand inform barrel gorilla
For brevity I use command expansion and string interpolation to generate the challenge phrases. You can use any string you like for the challenge phrase and are not limited to phrases generated by kli challenge generate.
Brett Prepares Challenge Words
First Brett sets up the challenge to verify the identifier Allie is using is really the one he expects her to be using. He will create a set of challenge words, have her sign the words, send back a message with the words and a signature over those words, and then verify that signature against Allie’s public key as found in her key event log (KEL).
export BRETT_WORDS="$(kli challenge generate --out string)"

Example output:
face tool wave target pudding under husband aerobic pool great inquiry retire
These are the words Brett gives to Allie to verify she really controls the identifier she is communicating with.
Allie Creates A Challenge Response
Allie prepares a response to Brett’s challenge words by signing the challenge words she received from Brett in an out of band communications channel such as in the chat on a video call or through a voice call. Brett sends his words to Allie. Allie then signs the challenge words and sends Brett a challenge “response” for Brett to verify:
kli challenge respond \
    --name allie_ks \
    --alias magic-pencil \
    --recipient secret-speaker \
    --words "${BRETT_WORDS}"
Brett Verifies Allie’s Response To His Challenge
Brett then verifies that Allie signed the correct challenge words with the keys tied to identifier she told him she is using, magic-pencil, as shown in the “signer” argument below to kli sign verify.
Brett verifying Allie’s challenge response:
kli challenge verify \
    --name brett_ks \
    --alias secret-speaker \
    --signer magic-pencil \
    --words "${BRETT_WORDS}"

Output:
Checking mailboxes for any challenge responses..

Signer magic-pencil successfully responded to challenge words: '['term', 'spatial', 'weasel', 'prison', 'sniff', 'worth', 'unfold', 'balance', 'motor', 'monkey', 'cloud', 'economy']'
What completion of this process means is that Brett can trust that Allie truly controls the identifier he is communicating with, magic-pencil, so he can trust that future data he receives from that identifier is really coming from Allie. This illustrates authenticity of communication between Brett and Allie, a critical part of the KERI ecosystem.
Allie Prepares Challenge Words
Like Brett, Allie prepares a set of challenge words that she will deliver to Brett in an out of band communication channel such as a video or voice call.
export ALLIE_WORDS="$(kli challenge generate --out string)"

Example Output:
paper senior final across perfect update blade young stereo train oval toy
These are the words that Allie will give to Brett to verify she is indeed communicating with Brett’s identifier.
Brett then similarly prepares a response to Allie’s challenge words and Allie verifies Brett’s challenge response.
Brett preparing a response to Allie’s challenge words:
kli challenge respond \
    --name brett_ks \
    --alias secret-speaker \
    --recipient magic-pencil \
    --words "${ALLIE_WORDS}"
Allie verifying Brett’s challenge response:
$ kli challenge verify \
      --name allie_ks \
      --base /keri/allie \
      --alias magic-pencil \
      --signer secret-speaker \
      --words "${ALLIE_WORDS}"

Example Output:
Checking mailboxes for any challenge responses..

Signer secret-speaker successfully responded to challenge words: '['life', 'lift', 'sheriff', 'same', 'gentle', 'traffic', 'foot', 'trash', 'approve', 'dawn', 'audit', 'type']'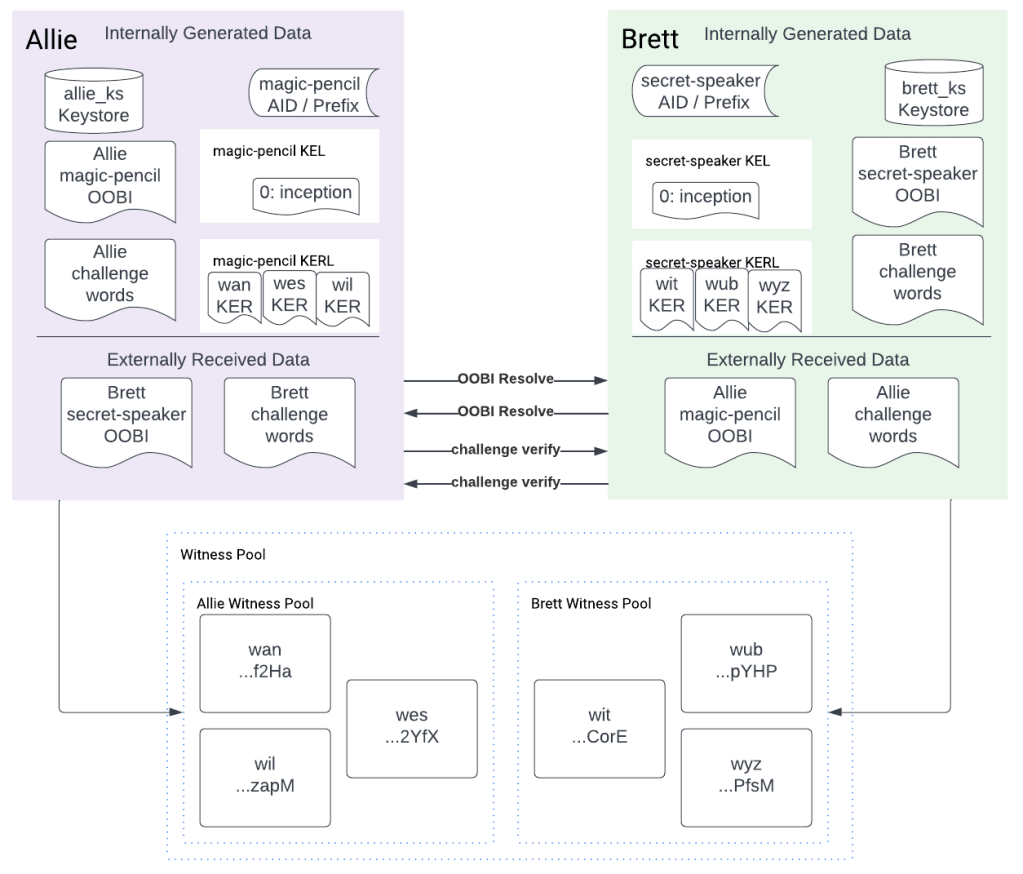
Step 8: Write and sign the love letter
Now we can finally do what we came here to do! It’s time to write the letter and sign it.
Allie writes the first love letter using a temporary file that she separately sends to Brett.
love_letter=$(mktemp)
cp -v ${love_letter} ${love_letter}.json
echo '{"love_letter": "well, hello there, honey. Happy Valentines :*"}' >${love-letter}.json
And Allie then signs it:
kli sign \
    --name allie_ks \
    --alias magic-pencil \
    --text ${love_letter}.json
Since the output includes a numbered list then we have to parse that list to get just the bare signature.
a
Output (is a signature):
1. AAAZP-KPS1FtkeVNvvm8uSFJqlDNmJy8tpD1hB2-OYcmlP39Fog4wETcDEL_4QNXHeUVV_QiuUpqbxgIzAaiV9EK
To parse this and place it in a variable the script uses a combination command using sed and command substitution:
export ALLIE_SIGNATURE=$(kli sign \
    --name allie_ks \
    --alias magic-pencil \
    --text ${love_letter}.json | sed -E 's/^[0-9]+\. //')
Then Allie sends her message and this signature to Brett (through the variable) so he can verify her message. Brett then verifies the message like so:
export ALLIE_SIGNATURE=$(kli sign \
    --name allie_ks \
    --alias magic-pencil \
    --text ${love_letter}.json | sed -E 's/^[0-9]+\. //')
Step 9: Verify the love letter signature
Brett wants to know this letter really is from Allie so he verifies it with kli verify. Brett verifies Allie’s signature on the love letter:
kli verify \
    --name brett_ks \
    --alias secret-speaker \
    --prefix ${ALLIE_PREFIX} \
    --text ${love_letter}.json \
    --signature $ALLIE_SIGNATURE
This produces the following result:
Output:
Signature 1 is valid.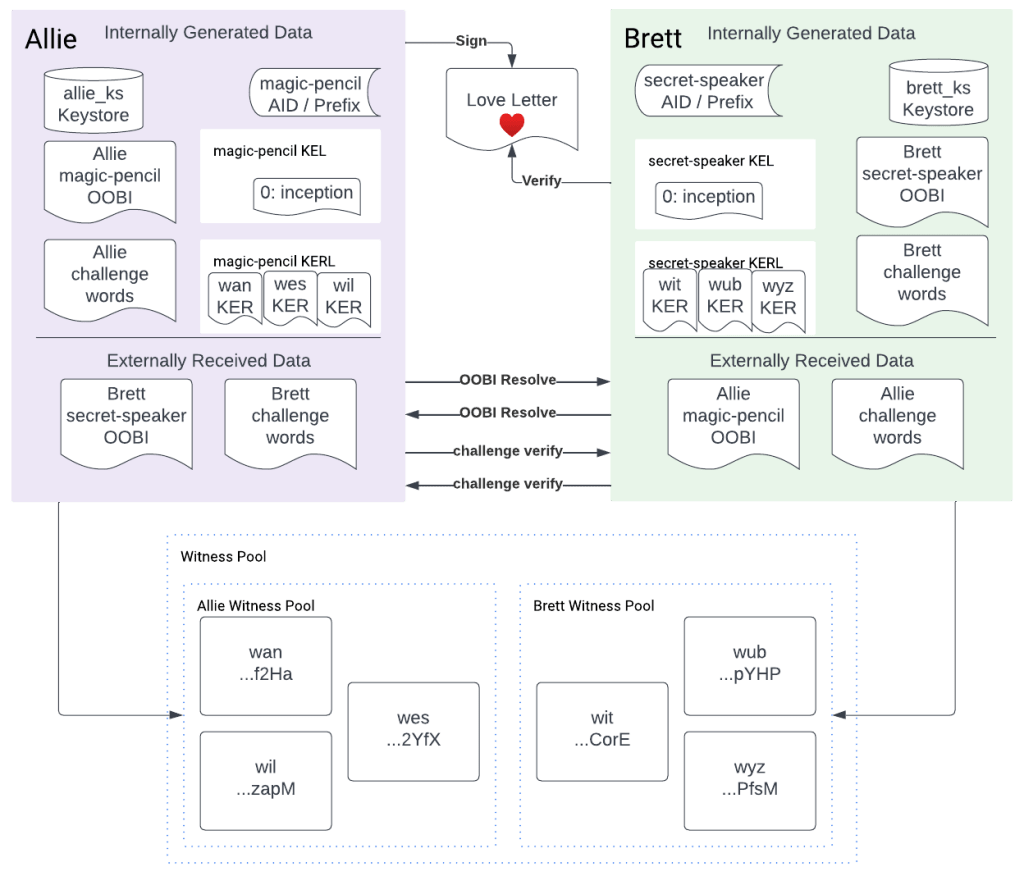
Step 10: Write and sign the love reply
In turn, for such a show of affection from Allie, Brett signs and returns a love reply.
Brett's love reply:
$ echo '{"love_letter": "Hey sweetie, I got your letter! <3 <3"}' > /keri/heartnet/love-reply.json
And then he signs it like so, again, using command substitution and the sed command to extract the first signature from the first line of output from kli sign:
export BRETT_SIGNATURE=$(kli sign \
    --name brett_ks \
    --alias secret-speaker \
    --text ${love_letter_reply}.json | sed -E 's/^[0-9]+\. //')
Step 11: Verify the love reply
Allie wants to be sure this reply to her letter really came from Brett so she will verify the signature Brett sent her. Allie verifies Brett’s love reply by checking his signature of it:
kli verify \
    --name allie_ks \
    --alias magic-pencil \
    --prefix ${BRETT_PREFIX} \
    --text ${love_letter_reply}.json \
    --signature $BRETT_SIGNATURE

Output:
Signature 1 is valid.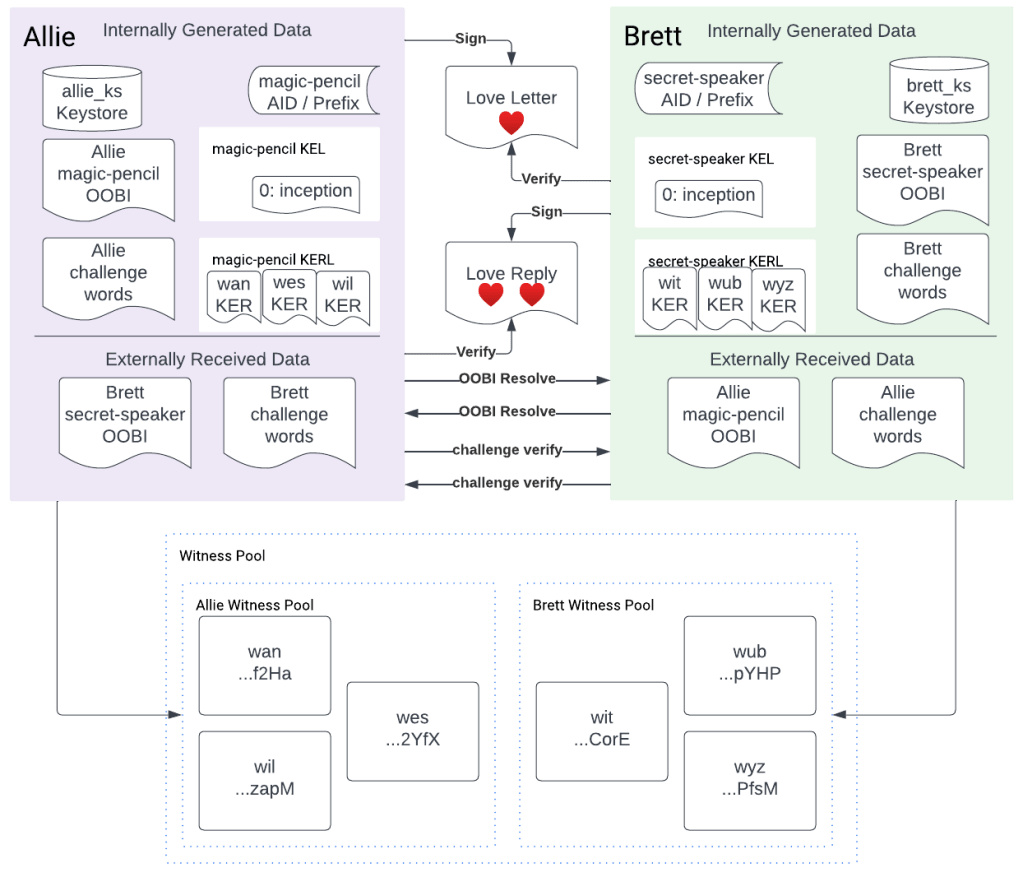
It verifies! Both Allie and Brett can enjoy their secure, authentic love letter communications.
After this then the script clears out all of the temporary files and shuts down the witness network.
Wrap up
Brett and Allie had a great laugh knowing they have a secret conversation that nobody else knows about where they can trust that they were really communicating with each other. They can now have a happy, peaceful valentines.

You have learned about the following KERI concepts:
- Installing KERI
- KERI Keystores
- KERI identifiers – autonomic identifiers
- Inception events
- Out of band introductions (OOBIs)
- KERI MFA challenge phrase response and verification process
- KERI Signing and Verification
- The KERI Command Line tool, the KLI
And as you found out, KERI is very approachable and easy to learn.
See you in the next tutorial!
References
Categories: KERI

1 reply ›